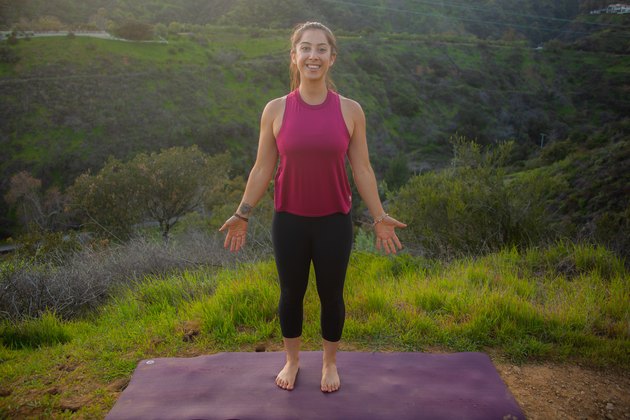
There are so many reasons to start a yoga practice, but for a beginner, entering a packed yoga class for the first time can be daunting. Many yoga poses put your body in unique shapes that are very different than a typical workout, so don't surprised if you feel a bit clumsy at first. With practice, proper instruction and dedication, though, you'll get the hang of it in no time.
Advertisements
Joan Hyman, an international yoga teacher, recommends finding a class where the teacher has experience catering to all levels, especially beginners. While there are thousands of yoga poses to choose from, it's important to start with the basics. Yoga poses for beginners include postures that teach proper spinal alignment, breathing technique and core strength.
1. Mountain Pose (Tadasana)
While Tadasana may seem like a simple yoga pose, the hard part is getting and staying in alignment. "When in Tadasana, a teacher is looking that the student has awareness of their plumb-line, meaning the head is stacked over the hips and the ears, shoulders, hips, and knees, all line up," says Hyman.
HOW TO DO IT: For beginners Hyman recommends standing with feet hip-width apart. Lift all 10 toes off the ground, spread them wide, and then set them back down. Engage your quadriceps and draw your navel in. Internally rotate the upper thighs just slightly, lengthen your tailbone toward the floor and lift the pubic bone toward the navel. Lift your breastbone while softening the lower ribs. Externally rotate the arms so your palms face forward and let your arms hang by your sides. Roll the shoulders down the back. Tuck the chin in slightly and lift the crown of your head up.
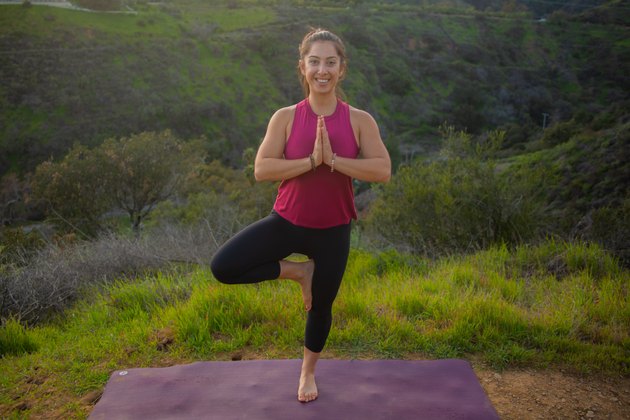
2. Tree Pose (Vrksasana)
Tree pose is an excellent pose to build single-leg strength and balance. It serves as preparation for more advanced balancing poses such as Dancer's pose or Warrior III. Balancing poses like Tree pose are excellent for honing your focus. To maintain balance, find your drishti (focal point) and continue to breathe evenly and deeply.
HOW TO DO IT: Start by standing in Tadasana. Shift your weight into your right leg. Bend the left knee and place your foot on the upper right thigh with your toes pointing down. Maintain evenness through your pelvis by lengthening the tailbone toward the ground and drawing the pubic bone up toward the navel and drawing an imaginary line between your two frontal hip points. Either bring your hands to your hips, connect your palms at heart center or reach your arms up overhead.
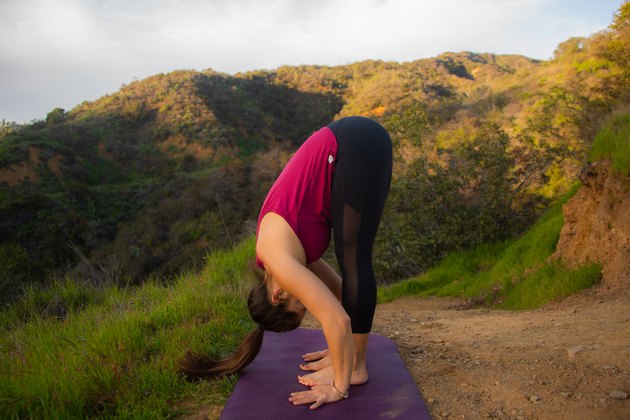
3. Forward Fold (Uttanasana)
Forward fold stretches your hamstrings, but if performed incorrectly, they can do more harm than good. "The two common problems you will see are in a tighter body, the lower back rounding, which creates strain in the low back, and on a bendy body, who can easily fold forward, the hips hinging behind the ankles, creating strain in the hamstrings and the tendons in the back of the knees," says Hyman.
HOW TO DO IT: Start in Tadasana. Inhale as you reach your arms overhead. As you exhale, fold forward, hinging at the hips. Place your hands on the floor beside your feet or on blocks depending on your flexibility. Keep a slight bend in your knees and stack your hips over your knees and your knees over your ankles.
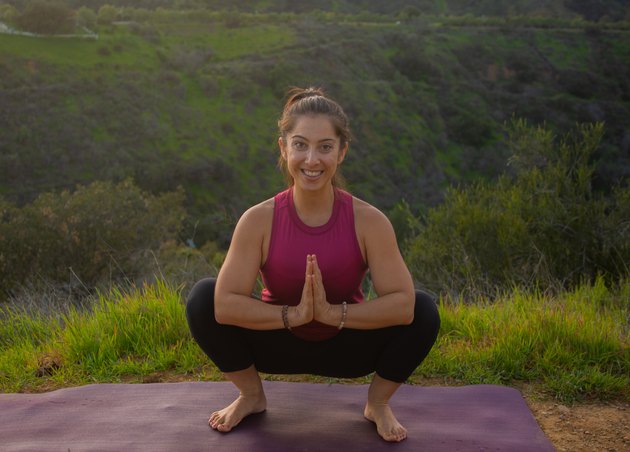
4. Yogi Squat (Malasana)
Many yoga poses demand healthy and mobile hips, but since people sit for longed periods of time, many have limited hip mobility. Malasana helps open the hips and ankles, lengthen the groin and inner thighs and decompress the lower back.
HOW TO DO IT: With your knees hip-distance apart and your feet turned slightly out, bend your knees and sink your hips down. Maintain length in your spine as you lift your sternum, open your chest and relax your shoulders away from your ears. Bring your hands into a prayer position, gently pressing your elbows against your inner thighs. If you need to, roll your mat up and place it under your heels.
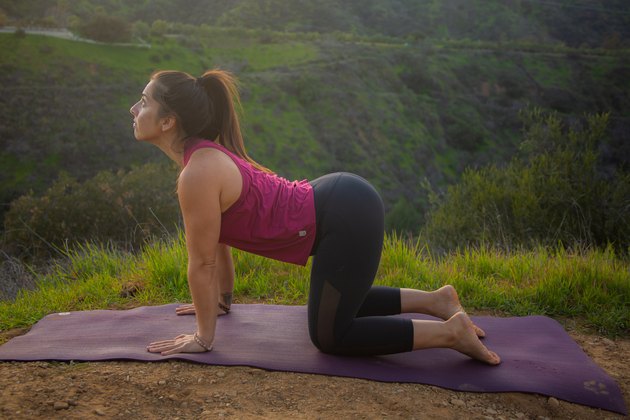
5. Cat Cow (Marjaiasana Bitilasana)
Especially as a beginner, it's important to make time to mobilize your spine. Unlike your muscles, cartilage has no direct blood supply. The health of your joints is dependent on movement. To get your spine mobile and healthy, it's important to get movement around the joints of the spine in order to release synovial fluid to reduce friction and improve ease of movement.
Advertisements
HOW TO DO IT: Start on all fours with your knees under your hips and your hands under your shoulders. Draw your navel in toward your spine and arch your back like a cat. Starting at your tailbone, begin to extend your spine, vertebrae by vertebrae, until you are in a swayback position. Continue slowly alternating between the two.
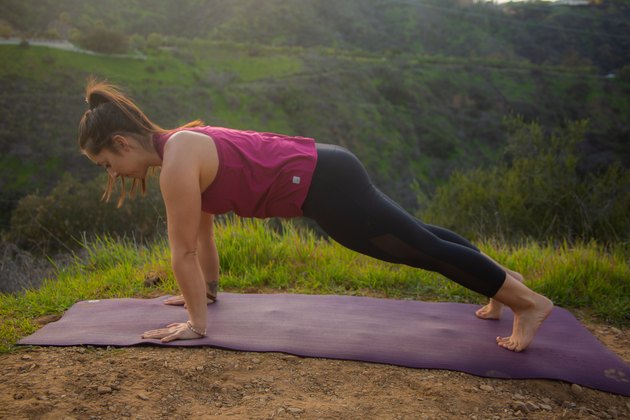
6. Plank Pose (Kumbhakasana)
Plank pose is one of the best core exercises you can do. Like Mountain pose, it may seem simple, but there are many subtle cues to pay attention to in order to fine tune your plank to build a strong foundation.
HOW TO DO IT: Start on all fours, and then step your feet back into an upper push-up position. Make sure your hands are shoulder-width apart with your fingers facing forward. Stay on the balls of your feet, engage your legs, draw navel to spine and lengthen your tailbone toward your heels. Keep your neck in line with your spine.
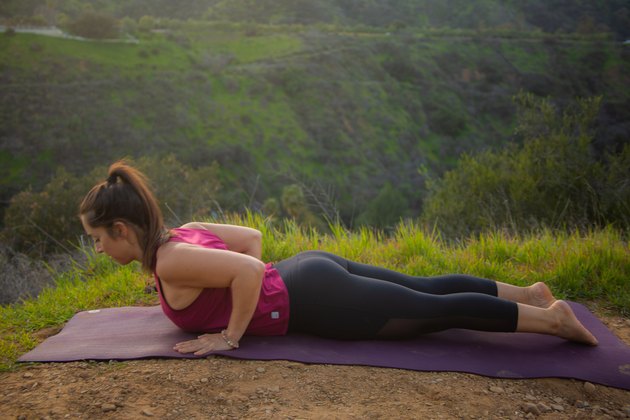
7. Cobra (Bhujangasana)
"Slow and steady is the best way to approach backbends," says Hyman. "If a student has tight shoulders and upper back, most people will compensate and bend in the neck region. It's important before teaching upward dog and deeper backbends, to work cobra until students have mobility in their shoulders and can draw the upper back in towards the chest."
HOW TO DO IT: Lie on your stomach with legs together, tops of the feet down and hands under your shoulders. With an inhale, peel the chest away from the floor. Roll your shoulders back and down your spine as you begin to straighten the arms as your flexibility allows. Be cautious not to go too far too soon. Breathe deeply and maintain awareness of the feedback your body is providing to avoid stress or strain.
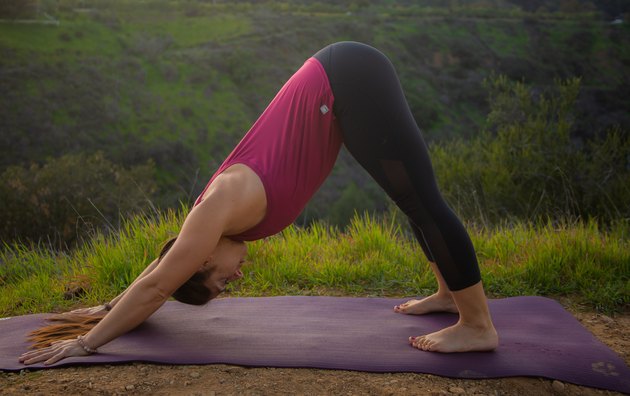
8. Downward Facing Dog (Adho Mukha Svanasana)
Downward facing dog is a foundational pose in many styles of yoga. It strengthens the shoulder girdle, core and legs and stretches the hamstrings and calves. It's also a gentle inversion, which reverses the flow of blood in the body, benefiting the circulatory and lymphatic systems and fighting the effects of gravity on the body.
HOW TO DO IT: Starting from a tabletop position, curl your toes under and lift your hips up, straightening your legs. Draw your shoulders down your spine away from your ears. Elongate your spine and extend the backs of the legs only as far as the hamstrings allow. Depending on your flexibility, bring your heels down toward the mat or stay on the balls of your feet with knees bent. If your heels do not touch the ground, Hyman recommends putting a bolster under your heels or pressing the heels into a wall.
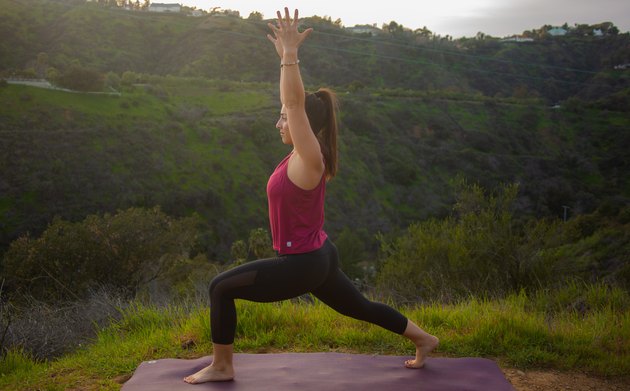
9. Crescent Pose (Anjaneyasana)
Crescent pose requires balance and coordination, so Hyman recommends working lunges in stages. "For a true beginner, having them do a high lunge where the back knee is lifted off the floor and the hand are either on the ground or on blocks will help them create stability and access the front part of the hips known as the hip flexors. Once they can use their legs and core to create stability in the hips, then a student can lift their hands off the floor."
HOW TO DO IT: From Downward Facing Dog, step your right leg forward between your hands. Keep a bend in the front leg as you inhale and lift the torso. Bring your arms up by your ears and palms facing each other. Keep a slight bend in your back leg. Lengthen your tailbone toward the floor and keep core engaged being mindful not to flare the ribs forward. Push back through your left heel while keeping hips level and square to the front. Repeat on the other leg.
Advertisements
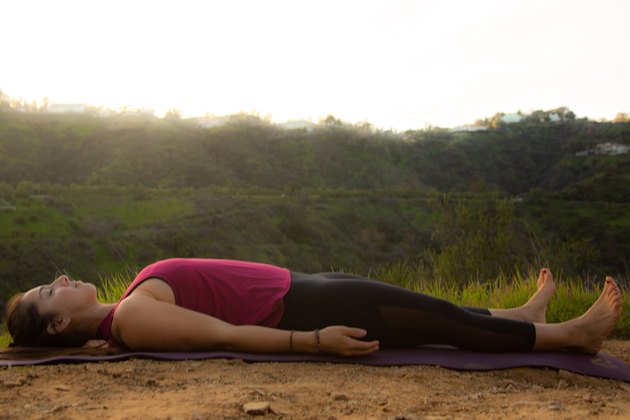
10. Corpse Pose (Savasana)
Corpse pose is usually at the end of a yoga class for deep relaxation, but for some it can be anything but relaxing. "For someone who doesn't do yoga, getting still and looking inward can be challenging," says Hyman. She suggests thinking of it as a body scan — starting at your feet and working all the way to your head.
HOW TO DO IT: Lie on your back. Place a small pillow or rolled-up blanket under your head and/or a bolster under your knees if you want. Find length through your lower back and relax the pelvis and hips. Let your arms rest by your sides with your palms facing up. Breathe with ease and relax every part of your body.
REFERENCES & RESOURCES Joan Hyman, yoga teacher


Comments